

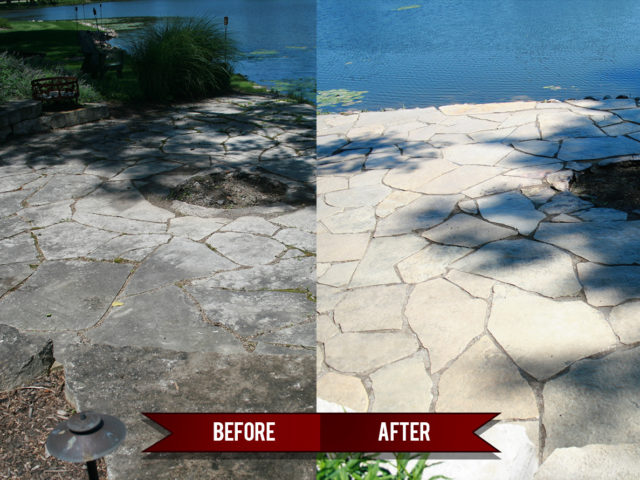
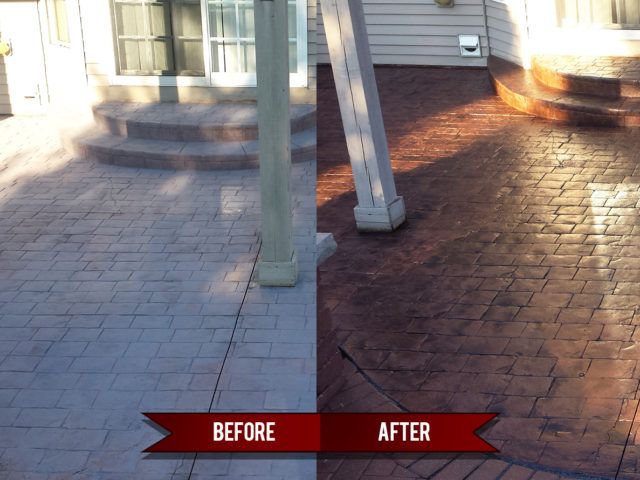
Your house becomes more appealing through the use of pavers. You can apply these pavers throughout driveways, patios, walkways and swimming pool areas. However, pavers gradually become pale and weaken as time goes by. Because they face harm from exposure to the sun, alongside rain and accumulation of dirt and weeds. Thus, we will discuss the best way to seal pavers in this article.
Sealed pavers prevent their fading and cracking as well as their absorption of stains. Weeds grow between the joints. The entry of water leads to erosion in pavers. A suitable sealer functions as a safeguard against various damaging effects. The following article will explain the optimal method for paver sealing. It also includes professional recommendations from Paver Protector.
Why Seal Your Pavers?
Sealing pavers has many benefits. First, it protects them from harsh weather like sun and rain. Without a sealer, pavers can lose their color due to ultraviolet radiations. A strong sealer acts like sunscreen. It blocks out the sun and keeps the pavers looking new.
Also, sealers protect from stains. Think of oil spills from your car, dirt, or even food and drink stains from parties. Once sealed, pavers become easier to clean.
Another benefit is weed control. Sealing fills in the joints and blocks weed seeds from growing. It also prevents bugs like ants from building homes under your patio or driveway.
Best of all, sealed pavers last longer. Therefore, you won’t have to replace or repair them often. This saves you money in the long run and keeps your home looking beautiful.
Best Way to Seal Pavers: Step-by-Step Process
Sealing pavers the right way is important. So, follow these steps for the best results.
- Clean the Pavers
Start by sweeping the area to remove leaves, dust, and loose dirt. Then, use a pressure washer to deep clean the surface. This helps remove mold, moss, oil stains, or algae. Cleaning is one of the most important steps. If dirt stays on the surface, the sealer will trap it underneath.
Tip: Use a special paver cleaner if you notice tough stains. However, avoid using corrosive chemicals that can damage the stone.
- Let the Pavers Dry
After cleaning, give the pavers time to dry. This usually takes 24 to 48 hours. But, if the surface is still wet, the sealer won’t stick well. Moisture can also cause cloudiness in the finish.
- Choose the Right Sealer
There are two main types of paver sealers:
Wet-look sealer: This gives your pavers a dark look. It makes the colors look deeper and richer.
Natural-look sealer: This keeps a more natural, matte finish. It’s best if you want the pavers to look like they did before sealing.
So, choose based on your personal taste and your home’s style.
- Apply the Sealer
Use a sprayer, roller, or brush to apply the sealer. Work in small sections to ensure even coverage. Do not pour the sealer directly on the pavers.
Tip: Always wear gloves and a mask. Also, work in a well-ventilated area.
- Let It Cure
Check the label on the sealer for drying and curing times. Some sealers dry in a few hours. Others take a full day. Meanwhile, make sure pets and people stay off the area during this time.
- Apply a Second Coat (Optional)
In some cases, a second coat gives extra protection. This is especially helpful in high-traffic areas like driveways. Just make sure the first coat is dry before adding another.
Paver Sealing Tips for Best Results
- Check the weather forecast: Do not seal if rain is expected in the next 24–48 hours.
- Test first: Apply the sealer to a small hidden area. Then, see how it looks when dry.
- Don’t overapply: Too much sealer can make pavers look cloudy.
- Keep up with maintenance: Reseal pavers every 2 to 5 years, depending on your climate and traffic.
- Use high-quality sealers: Cheaper products may not last long or give good protection.
DIY vs. Hiring Paver Protector Professionals
Doing It Yourself
Some homeowners prefer to seal pavers themselves. It can be cheaper and satisfying to do the job on your own. However, sealing pavers is not as easy as it looks. You need the right tools, time, and patience. A mistake can cost more later.
Hiring Paver Protector
On the other hand, hiring Paver Protector gives you peace of mind. Our team has years of experience. We know how to prep the surface, choose the best paver sealer, and apply it evenly.
We use top-grade products that last longer. Also, we make sure your pavers are sealed safely and correctly. No streaks. No mess. Just clean, long-lasting results.
What Does It Cost?
Now, sealing pavers costs depend on the size of your area, the type of pavers, and the sealer used. DIY might seem cheaper, but mistakes can lead to expensive repairs. A professional job lasts longer and often comes with a warranty. So, that means you get better value in the long run.
Common Mistakes to Avoid
- Don’t seal dirty or damp pavers: Always clean and dry first.
- Plus, don’t skip surface prep: Cleaning is the foundation for success.
- Don’t use the wrong tools: The wrong brush or sprayer can cause uneven coverage.
- Finally, don’t rush drying: Let the sealer cure fully before walking or driving on it.
Conclusion
Sealing your pavers is one of the best things you can do to protect your investment. It keeps them strong, clean, and beautiful for years. Whether you want a natural look or a matte look, sealing is the key.
While you can do it yourself, hiring Paver Protector ensures the best results. We use professional tools, the best paver sealers, and years of skill to make your pavers last longer and look amazing.
So, get a free quote today, schedule your paver sealing, or contact us for more details!


